

Tutorial B: From Raw Data to a Robot Model
This tutorial uses teleoperation data from a Station Lite dual-arm workstation to walk through the complete workflow: collect → curate → dataset → train → model → deploy and validate.
When to Use This Tutorial
- You want a robot to learn a new manipulation skill, such as pick and place, sorting, or flower arranging.
- You can teleoperate a robot to record tens to hundreds of demonstrations.
- You need training results that are reproducible and traceable, and you want to validate them on a real robot.
Before You Begin
| Requirement | Details | Reference |
|---|---|---|
| Role | FAE or R&D engineer | Roles and Permissions |
| Device | Station Lite registered, with a teleoperation device bound | Device Management |
| Compute | An available training compute quota | Accounts and Members |
| Inference node (for deployment) | A qualifying edge inference node, or cloud inference | Deployment Overview |
Workflow Overview
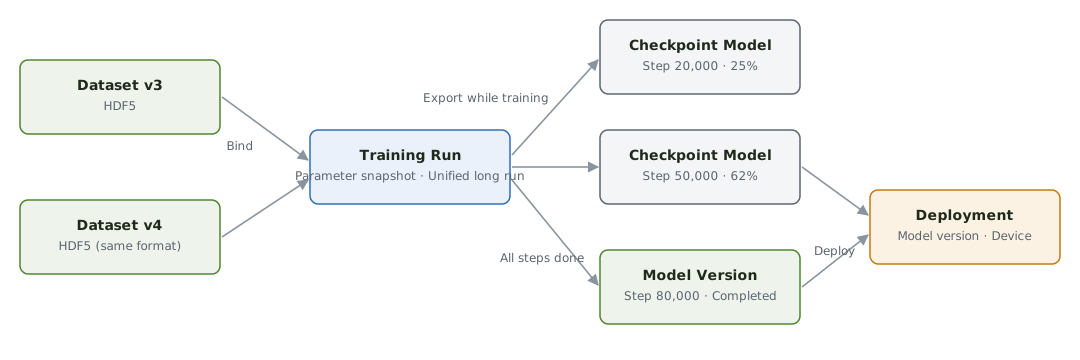
① Collect and upload → ② Curate → ③ Export a training dataset → ④ Create a training job → ⑤ Track training
→ ⑥ Export a checkpoint to validate direction → ⑦ Manage and download the model → ⑧ Deploy and validate on the robot
Step 1: Collect and Upload Data
Where: Data Collection → Collection Tasks, then click New.
- Select device model
Station Lite. The storage format is automatically set toHDF5. - Select device SN
ST-2609-0001. - Select Full upload, which is recommended for small batches of high-value demonstrations.
- Enter task name
pick_place_station, a scene, a target count of100, a collector, and a due date, then click Create Task. - The collector claims the task and records the teleoperated demonstrations. Each episode uploads automatically when it ends.
Done when progress reaches 100/100, every upload is complete, and the task status is Completed.
How many demonstrations?
Pick-and-place tasks in a single scene typically start with 50 to 200 demonstrations. Run the full workflow on a small batch first, then collect more based on evaluation results.
Step 2: Curate the Data
- Go to Data Curation → Data Assets and filter by collection task. The format shows
HDF5and the status shows Ready to Curate. - Select all episodes and create the curation project
pick_place_v1. - Step through each episode in the data workbench:
- Label failed grasps, collisions, and long pauses as
Anomaly_<note>and mark them as excluded ranges. - Mark entirely unusable demonstrations for exclusion.
- Click Mark as Reviewed after checking each episode.
- Label failed grasps, collisions, and long pauses as
- For large batches, first run black-frame detection and joint-data validation scripts from Batch Processing to generate candidate labels, then confirm them manually.
HDF5 data already includes robot state, so no pipeline run is needed. See Data Workbench.
Step 3: Export a Training Dataset
- Click Export in the workbench, enter the name
pick_place_v1, and choose HDF5.- The platform's built-in training templates use HDF5 directly.
- Choose LeRobot if you plan to train in an open-source framework.
- When the export completes, the dataset status is Exported and the version is frozen.
Only dataset versions in the Exported state can be used for training.
Step 4: Create a Training Job
Where: Model Training → Task Management, then click Create Training Job.
| Setting | Value in this example | Notes |
|---|---|---|
| Job name | Pick and place v1 | Any characters allowed |
| English name | pick_place_v1 | Letters, digits, and underscores only; used to name artifacts |
| Training data | pick_place_v1 (v1) | Multiple versions allowed if they share a format |
| Model family | ACT | EasyDP, Pi 0.5, and R0 are also available |
| Compute tier | Standard | 4 × GPU, suitable for typical training |
| Training strategy | Long-horizon, quality-first | Set by the platform; cannot be changed |
Click Submit. The platform locks the parameter snapshot: training steps, learning rate and schedule, batch size, optimizer, random seed, and dataset versions.
Step 5: Track Training
Where: Click Details on the training job card in the job list.
| Status | Meaning |
|---|---|
| Queued | Waiting for available compute; the queue position is shown |
| Training | In progress; the current step and loss curve are shown |
| Completed | Ran the full step budget (currently 80,000 steps) and produced a model version |
| Stopped / Failed | Stopped manually or terminated abnormally; check the logs |
The details page shows the loss curve, learning rate schedule, throughput, GPU utilization, and logs. A loss that decreases steadily and then levels off indicates normal convergence.
Step 6: Export a Checkpoint to Validate Direction Early
You don't have to wait for training to finish before validating.
- On the training job details page, click Export Checkpoint.
- The platform registers the current weights as a checkpoint model, labeled with its progress at export, for example "Step 20,000 · 25%".
- Run an inference test with the checkpoint (see Step 8). If the direction looks right, let training continue. If it's clearly off, stop the job and return to curation to adjust the data.
Exporting a checkpoint does not interrupt training; the job status remains Training.
Step 7: Manage and Download the Model
Where: Model Deployment → Model Management.
- When training completes, a model version appears in the model list, for example
pick_place_v1 · v20261020-01. - Click Details to see its lineage: training job, dataset versions, hyperparameter snapshot, and step count.
- To use the model locally, click Download to get the model artifact archive (weights, model config, normalization statistics, and inference config). See Downloading Model Artifacts.
Step 8: Deploy and Validate on the Robot
Where: Model Deployment → Inference Deployment.
- Choose a deployment type:
- Cloud inference for quick validation, with no local hardware required.
- Edge deployment for long-term on-site operation, which requires passing four pre-deployment checks.
- Select the model version and target device, and turn on NexBench evaluation if needed.
- Complete the safety confirmation before you start: no one within 1 m of the robot, a clear motion path, an emergency stop that is within reach and working, and a model that matches the task.
- Start inference, observe the run on site, and review execution records and evaluation results in the inference job details.
See Deployment Overview and Validation and Evaluation.
What You Get
| Output | Location |
|---|---|
Dataset version pick_place_v1 | Dataset Management |
| Training job and parameter snapshot | Training job details |
| Checkpoint models and final model version | Model Management (downloadable) |
| Deployment and inference records | Inference Deployment |
How to Confirm You're Done
- [x] The training job status is Completed.
- [x] The model version appears in Model Management with complete lineage.
- [x] At least one deployment ran successfully and on-site validation reached a conclusion.
- [x] Failure segments have been reviewed in Data Feedback.
Common Issues
| Issue | Resolution |
|---|---|
| No dataset available when creating a training job | Confirm the dataset is Exported and that multiple selections share a format |
| The job stays queued | No compute is available yet. Leave it queued; don't resubmit. |
| Loss isn't decreasing | Check whether the dataset contains many failed demonstrations that weren't excluded, and run an inference test on a checkpoint |
| The edge deployment button is disabled | Check which pre-deployment checks are missing and run nexcore-edge check on the node |
| Inference results are poor | Review bad cases in Data Feedback, then collect more data or adjust curation, export a new version, and retrain |
Next Steps
- Learn more about training configuration: Creating Training Jobs