

Tutorial A: From Raw Data to Annotated Data
This tutorial uses robot-free data recorded with Robot-free UMI to show how to turn raw recordings (RAW) into data with structured annotations, ready to download.
When to Use This Tutorial
- You recorded human demonstrations with a device such as Robot-free Ego or Robot-free UMI, and need structured data such as camera trajectories, depth, and hand keypoints.
- You need a quality-checked dataset with anomalous segments marked, for your own research or for delivery to a partner.
- You have HDF5 data from teleoperation. You can follow the same steps for quality annotation and export and skip the pipeline step.
Before You Begin
| Requirement | Details | Reference |
|---|---|---|
| Role | FAE or R&D engineer (configuring operator parameters requires an R&D engineer) | Roles and Permissions |
| Device | Robot-free UMI registered in the device inventory with its SN | Device Management |
| Collection task | A collection task bound to that device | Collection Tasks |
| Operators | The project's operator library contains the operator types you need (SLAM, vision, depth, and so on) | Developing Operators |
Workflow Overview
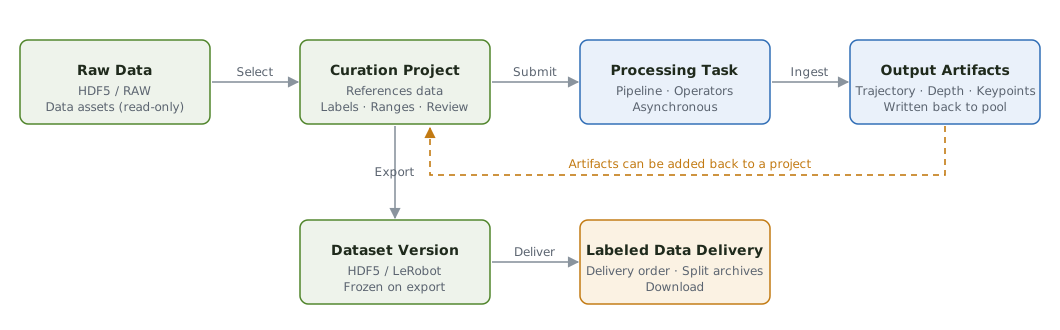
① Upload raw data → ② Confirm ingestion → ③ Create a curation project → ④ Select a pipeline and submit a job
→ ⑤ Track progress → ⑥ Review output → ⑦ Annotate and review quality → ⑧ Export → ⑨ Download
Step 1: Upload Raw Data
Where: The collector signs in and opens Data Collection → Collection Tasks.
- On the task card, click Claim Task, then Start Collecting.
- Record demonstrations with Robot-free UMI. Each episode uploads automatically according to the task's upload mode:
- Full upload: the complete episode uploads when it ends.
- Segmented upload: long recordings are split into 5-minute segments and uploaded while recording.
- The upload dialog shows progress. If the network drops, data is cached on the device and the upload resumes automatically.
What happens next: The platform runs integrity checks on each episode (channels, timestamps, and package counts must be consistent). Episodes that pass are assigned a data ID and ingested into the asset pool in RAW format.
Step 2: Confirm the Data Was Ingested
Where: Data Curation → Data Assets.
- Filter by Collection Task and select your task.
- Each row is one episode. The format column shows
RAWand the curation status shows Awaiting Pipeline.
| What you see | Meaning |
|---|---|
| Row count matches the number of episodes recorded | All data was ingested |
| Some rows show Validation Failed | The upload was incomplete; re-upload from the device |
| The list is empty | Data is still uploading, or the wrong task is selected |
Why can't I select items awaiting a pipeline?
RAW data contains no robot state, so it must be processed by a pipeline before it can be curated. Items marked Awaiting Pipeline can't be selected in the asset list, but you can process them through the pipeline entry in a curation project, as described in the next steps.
Step 3: Create a Curation Project
Where: Data Curation → Curation Projects, then click New Curation Project.
- Enter a project name, for example
pick_place_umi_labeling. - Under Source Data, select your collection task.
- Select the episodes to process. The bottom of the dialog shows the matched count and the selected count.
- Click Create. The project opens in the data workbench.
Step 4: Select a Pipeline and Submit a Job
Where: The Pipeline button in the data workbench header.
- In Operator Management at the top of the dialog, select the output types you need, for example:
- SLAM: camera trajectory and pose sequence
- Depth: per-frame depth maps estimated from stereo video
- Vision: hand keypoints and other structured visual results
- In the Pipeline Chain in the middle, check the three stages: prerequisites → operator execution → post-processing. Confirm the operator order and parameters. Parameters are configured by R&D engineers and are read-only for other roles.
- Click Start Processing in the lower-right corner.
What happens next: The platform creates a processing job for the batch, assigns it a pipeline job ID, and sets its status to Processing.
Step 5: Track Progress
Processing jobs run asynchronously, so you can leave the page.
- A status bar at the top of the workbench shows the progress percentage and log count.
- Click the status bar to reopen the dialog and view execution logs for each operator on each episode.
- Processing time depends on data volume and the number of operators; refer to the progress shown on the page.
| Status | Meaning | What to do |
|---|---|---|
| Processing | Running | Wait, or leave and come back later |
| Completed | All required operators succeeded | Go to Step 6 |
| Failed | A required operator failed, so the whole batch is marked failed | Check the failed step and logs, then click Retry. Only failed steps are re-run. |
Step 6: Review the Output
When processing completes, the structured outputs are written to the asset pool and tagged with the pipeline job ID. The original RAW data is kept.
- Return to the data workbench; the project's episodes now show the processed outputs.
- Select an episode and check in the preview:
- the trajectory overlay lines up with the stereo video;
- depth maps are continuous, without large holes;
- keypoints track the hands as they move.
- Flag any problem episodes in the next step. If the overall quality falls short, ask an R&D engineer to adjust the operator parameters and resubmit the job.
A successful run doesn't mean the data is good
A completed job only means the outputs were generated. You still need to check, annotate, and review their quality in the workbench.
Step 7: Annotate and Review Quality
Work through each episode in the data workbench:
- Flag anomalies: Select a range on the timeline, click Add Label, and describe the issue in the note, for example "trajectory drift" or "hand occlusion". The label appears as
Anomaly_trajectory drift. - Define ranges: Mark unusable time ranges as Excluded Ranges, and mark entirely unusable episodes for Exclusion.
- Review: When you've finished checking an episode, click Mark as Reviewed.
Everything saves automatically. Only instructions are recorded; the original data is never modified. See Data Workbench.
Step 8: Export Annotated Data
- Click Export in the workbench header.
- Enter a dataset name and choose HDF5 or LeRobot.
- Click Start Export. The platform generates the data according to your annotations: it skips excluded episodes, trims excluded ranges, and writes an export manifest.
The result is a frozen dataset version. The export result is shown as "succeeded (failed)", for example 48 (2). Click Details to see the reason for each failed sample.
Step 9: Download Annotated Data
Where: Data Curation → Dataset Management.
- Download directly: Click Download in the dataset list to get the dataset files and export manifest as a multi-part archive.
- Deliver to others: Create a delivery order. Once it is approved, the data is packaged and published, and the recipient downloads it from the delivery link. See Annotated Data and Delivery.
What You Get
| Output | Contents |
|---|---|
| Dataset version | Sample files organized as HDF5 or LeRobot, containing the original sensor data and pipeline outputs |
| Export manifest | Data ID, source, review status, anomaly labels, and ranges for every sample |
| Processing record | Pipeline job ID, operator versions, and execution logs, traceable in the platform |
For file layouts, see Data Formats.
How to Confirm You're Done
- [x] The processing job status is Completed.
- [x] All episodes in the project are Reviewed.
- [x] The dataset status is Exported, and the reason for every failed sample is understood.
- [x] The dataset has been downloaded, or the delivery order is Published.
Common Issues
| Issue | Resolution |
|---|---|
| Pipeline parameters are read-only | Only R&D engineers can edit operator parameters. FAEs can still start processing. |
| The job failed | Check the failed step, input data, and logs, then retry the failed step. The original run record is kept. |
| No Export button after processing | Refresh the workbench. Projects that are still processing cannot be exported. |
| Export is blocked | Resolve the issues shown on the page, such as unreviewed episodes or missing channels. See Export Blockers. |
| Exported count doesn't match expectations | Check excluded episodes and excluded ranges, and look up the failed data IDs in Details. |
For more, see Troubleshooting.
Next Steps
- Train a model on this dataset: Tutorial B
- Learn what each operator produces: Data Pipelines
- Write your own operator: Developing Operators